Attack Simulation Training with Microsoft Defender
For years, Microsoft has offered built-in attack simulation training through Microsoft Defender for Office 365. However, I have rarely encountered anyone who is actively using the product. But why is that, you may wonder? There could be several reasons, but the most significant one is likely that the solution just wasn’t very good compared to third-party alternatives.Now, with the significant improvements Microsoft has made to the product and my own hands-on experience, I can confidently say that Microsoft has created a highly competitive solution. What I appreciate most about it is how easy it is to configure, combined with a tons of customization options. Additionally, it seamlessly integrates with Microsoft Defender for Office 365’s threat policies, eliminating the need for any whitelisting of domains or URLs.After gaining enough real-world experience and with Microsoft’s recent announcements of new improvements, such as training-only campaigns, interactive training videos, and automation options, I felt it was time to write a blog about it.In this blog, I won’t dive into every single feature or provide step-by-step instructions for attack simulations, as they are fairly self-explanatory. However, I will focus on the key features and share my experience with them.The blog is divided in the following sections;
One example of a Credential Harvest payload is the “Office 365 Email quarantine” shown in the image below.
In addition to the payload, you have the option to select a login page. The default choice is the English Microsoft login page, but there are other alternatives to choose from.
If these doesn’t satisfy your needs, Microsoft provides the option to create your own custom login page.
Then, we have the option to either import an existing email or create a new one. If you want you can add a signature with visuals as well. Additionally, you need to insert the phishing link into a piece of text, as shown in the example below.
When users click on the phishing URL, they will be directed to your fake login page. That is all it takes, it is THAT easy.
After selecting the payloads, we can determine who should be assigned training.
The default landing pages also include built-in indicators that help users recognize and identify phishing emails.
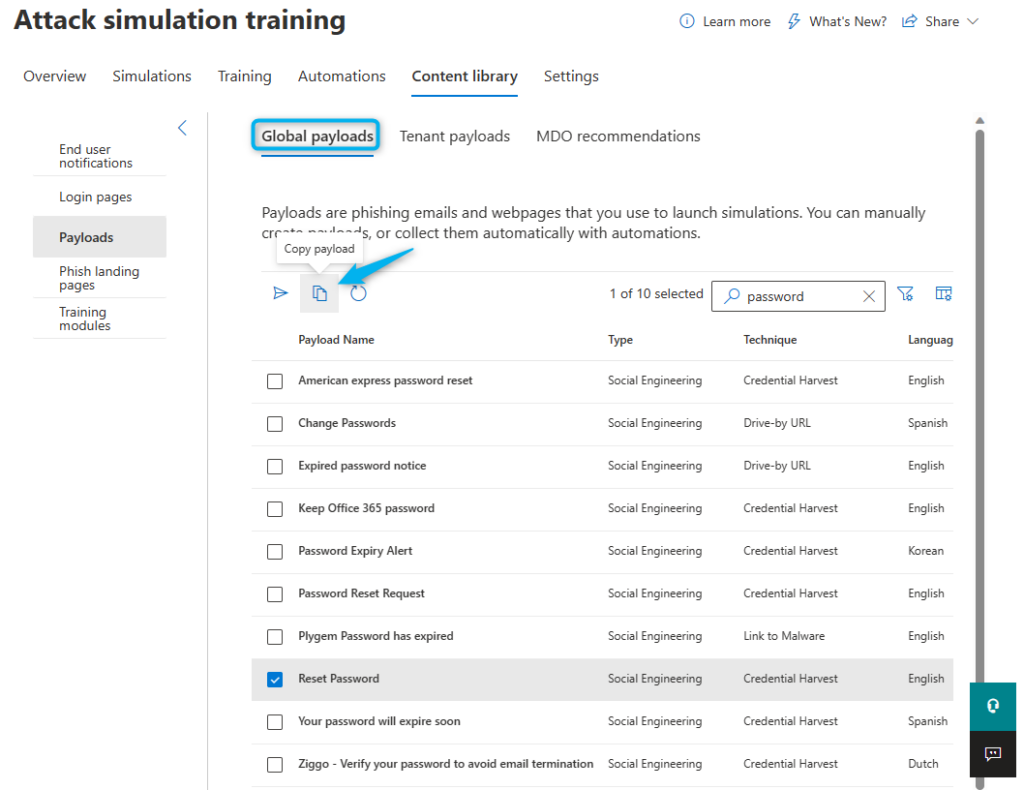
From here, you can also copy existing payloads and edit them, which is a convenient addition.
- Requirements
- Create an Attack Simulation
- Payloads
- Create custom payload
- Target users
- Assign training
- Landings page
- Training-only campaigns
- Content Library
- Attack Simulation results
- Conclusion
Requirements
To able to use the attack simulation features within Microsoft Defender, all users benefiting from it will need one of the following licenses assigned;- Office 365 E5 or Microsoft 365 E5 subscription license.
- Microsoft Defender for Office 365 P2 or Microsoft 365 E5 Security add-on license.
- Global Administrator
- Security Administrator
- Attack Simulation Administrator
Create an Attack Simulation
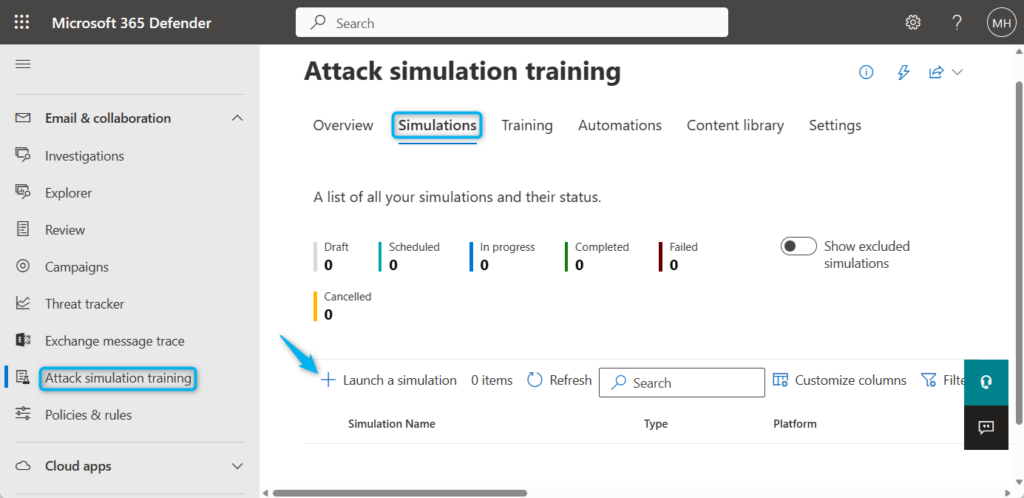
All attack simulations are created and managed from the Microsoft 365 Defender portal, follow these short steps to launch your own.- Go to Microsoft 365 Defender portal and navigate to Email & collaboration > Attack simulation training.
- Navigate to Simulations and click on + Launch a simulation.
Payloads
The most important thing to configure is the actual payload itself. Microsoft offers a wide ranges of payloads that are categorized based on different phishing techniques.- Credential Harvest: a message with an URL, which takes the user to a fake login page to steal their credentials.
- Malware Attachment: a message with an attachment, which can execute malicious code.
- Link in Attachment: a message with an URL inside an attachment, which takes the user to a fake login page to steal their credentials.
- Link to Malware: a message with an URL, which takes the user to a page to download malware, which can then execute malicious code.
- Drive-by URL: a message with an URL, which takes the user to a site which will try to gain information on the user or try to deploy code on the device.
- OAuth Consent Grant: a message with an URL, which takes the user to a page and asks for consent to gain application permissions to certain company data.
Create custom payload
Creating your own payloads might sound challenging, but I can tell you it is surprisingly quick and easy! Remember that you know your users best, so you can easily create a relevant scenario.If you choose to create your own payload, the first step is to fill in the sender details. You can input any name or email address of your choice; the domain itself does not even need to exist. Provide a name, email address, and email subject, and consider adding the “External” tag to the email if this is appropriate.Next, we need to select the site URL that our users will click on and be directed to.Target users
Determining which users to target during a simulation is a crucial decision because:- Certain payloads are more suitable for specific departments, such as invoice payloads for finance departments.
- Users who do not actively use their email or non-user accounts may never read the email, which can affect your compromise rates.
- Targeting a payload to a large number of users simultaneously can raise suspicion among users, potentially revealing the ongoing attack simulation before they have a chance to read the email.
Assign training
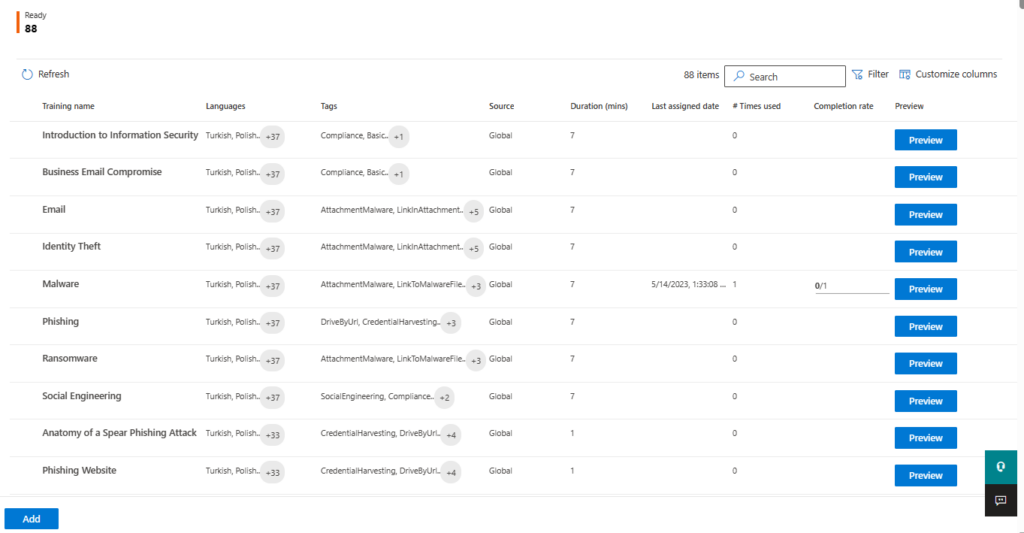
During the configuration of the attack simulation, you have the option to assign training to users. Microsoft provides a catalog of 88 different training modules, although it’s important to note that some modules are currently only available in the training-only campaigns, which I will discuss later.These interactive training videos serve as valuable tools to enhance security awareness among our end-users.If you are already using a third-party solution for security awareness training, you also have the flexibility to redirect users to an external URL.- All users: Regardless of their actions during the simulation, all users will receive an email with training assignments after 2 hours. It’s worth noting that selecting this option may result in users not clicking on any URLs or attachments once they are aware of the attack simulation. It would be beneficial if Microsoft allowed us to configure the timing of the email notification for users.
- Clicked payload: As soon as a user clicks the URL or attachment, they will receive an immediate email regarding the assigned training. I strongly discourage selecting this option since it notifies users about the attack simulation before they have had a chance to sign in using their credentials or enable macros in the attachment. Microsoft should introduce a delay for this option to be more effective.
- Compromised: After the user interacts with the payload, which could involve actions such as clicking the URL, providing credentials, enabling macros, or any other form of falling prey to the attack, they will receive the email notification for the assigned training. I would recommend using this option, as it specifically targets users who have been compromised during the simulation, providing them with the necessary training to improve their security awareness.
Landings page
While configuring the attack simulation, you will also need to choose the landing page where compromised users will be directed. Microsoft provides pre-designed templates that work perfectly fine, but you can also create your own custom page if you prefer.Training-only campaigns
One of the newest features available is the option for training-only campaigns without being required to actually run an attack simulation.My customers have been asking me for this feature on multiple accounts, so I am really glad that it is here. In the past, I’ve been cheating the system a little bit by setting up a fake attack simulation with the e-mail explaining users that the training assignment would follow afterwards.You can create these training-only campaigns by clicking on the + Create New in the Training section.Content Library
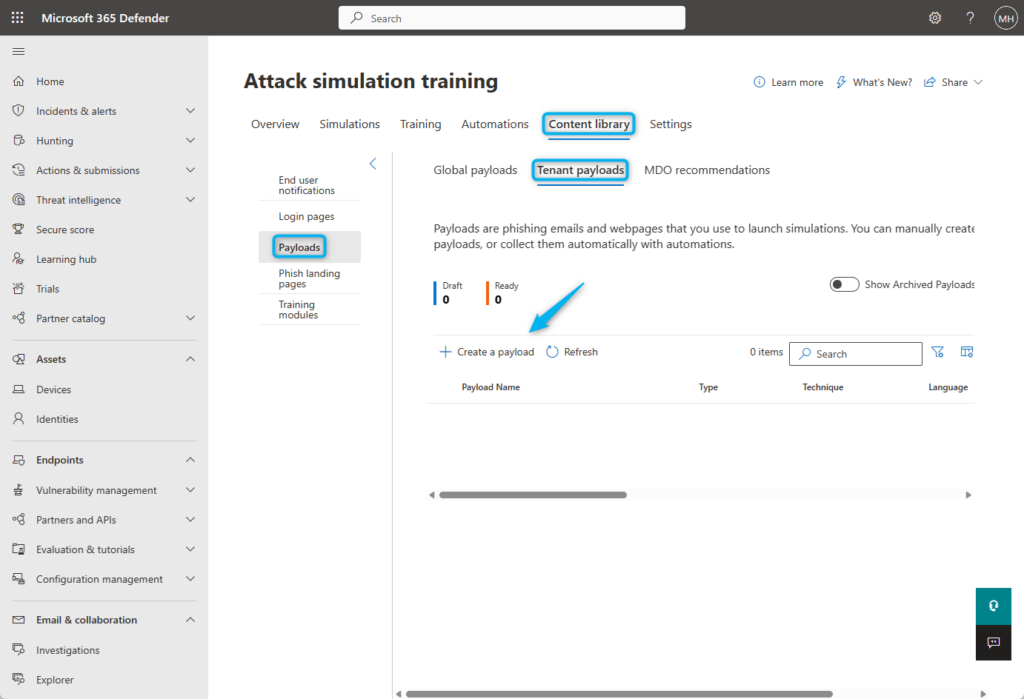
All custom content can be created in the portal’s Content Library section, where you can configure:- End user notifications
- Login pages
- Payloads
- Phishing landing pages
Attack Simulation results
After launching the simulation, you can view the results directly from the dashboard. Here, you can easily access and export the results, analyze user actions, and track the completion of assigned training.Conclusion
Despite my limited experience with other third-party solutions for a direct comparison, Microsoft Defender provides an excellent attack simulation solution that more companies should use, especially when you are already paying for the product.In addition to manually creation attack simulations which I showed in this blog, Microsoft has also recently introduced the option to automate these.Keep an eye out for my upcoming blog post, where I will explore the automation of attack simulations and highlight some other new upcoming features. 😉Attack Simulation Training with Microsoft Defender
Would you like to share your thoughts?
Your email address will not be published. Required fields are marked *


0 Comments