Manage Conditional Access exclusions with PIM
Sometimes in our dreams we envision a world without exclusions for Conditional Access policies, only to wake up and realize that this is not yet a reality. Since exclusions can significantly expand the attack surface it’s important to manage them effectively. So how can we deal with those pesky Conditional Access exclusions?
Many organizations create a Security Group for their exclusions or manually add users to the exclusions list of individual policies. This requires IT to add and remove users when necessary. However, in practice, IT often fails to check the exclusions regularly, resulting in permanent exclusions for users whose need for exclusion is no longer valid.
A different approach is to manage Conditional Access exclusions with PIM (Privileged Identity Management). To implement this, you’ll need a PIM feature formerly known as Privileged Access Groups, now referred to as PIM for Groups since January 2023. With this approach, we can provide users with just-in-time permission to exclude themselves from a Conditional Access policy, which enhances security by ensuring that access is granted only when necessary. To further increase security, we can require approval before users are allowed to exclude themselves.
With this method the amount of permanent Conditional Access exclusions required can be reduced, which brings us one step closer to our dream.
Aside from Conditional Access exclusions, PIM for Groups can be used in any scenario that uses the membership of a group. Some other useful just-in-time scenario’s I can think of are;
- Access to secrets in an Azure Key Vault.
- Access to Cloud apps.
- Access to files in a SharePoint or team site.
- Activating multiple Azure AD roles at once.
In this blog I am going to show you how you can manage Conditional Access exclusions with PIM which includes the following sections;
- Preparation
- Scenario
- Create Security group useable with PIM
- Configure PIM group settings
- Add PIM Group assignments
- Add PIM Group to Conditional Access policy
- Activating the PIM group
Preparation
To meet the licensing requirements you will need the following;
- Azure Active Directory Plan 1; for all users assigned to a Conditional Access policy.
- Azure Active Directory Plan 2; for all users who will use PIM for groups, including admins, approvers, and eligible PIM group members.
Additionally, make sure that you have a Conditional Access policy prepared where you can add exclusions to.
Scenario
For this scenario, I have a Conditional Access policy in place that requires device compliance before users are able to access the MarketingApp. Occasionally, external marketing consultants require access from unmanaged devices or users may be awaiting a laptop replacement due to hardware failure. Rather than adding these users as permanent exclusions, I will configure the PIM for Groups feature to give users the ability to temporarily exclude themselves from the Conditional Access policy.
Create Security group useable with PIM
To use PIM for managing group membership, you first need to onboard the group into PIM. Let’s start by creating the security group.
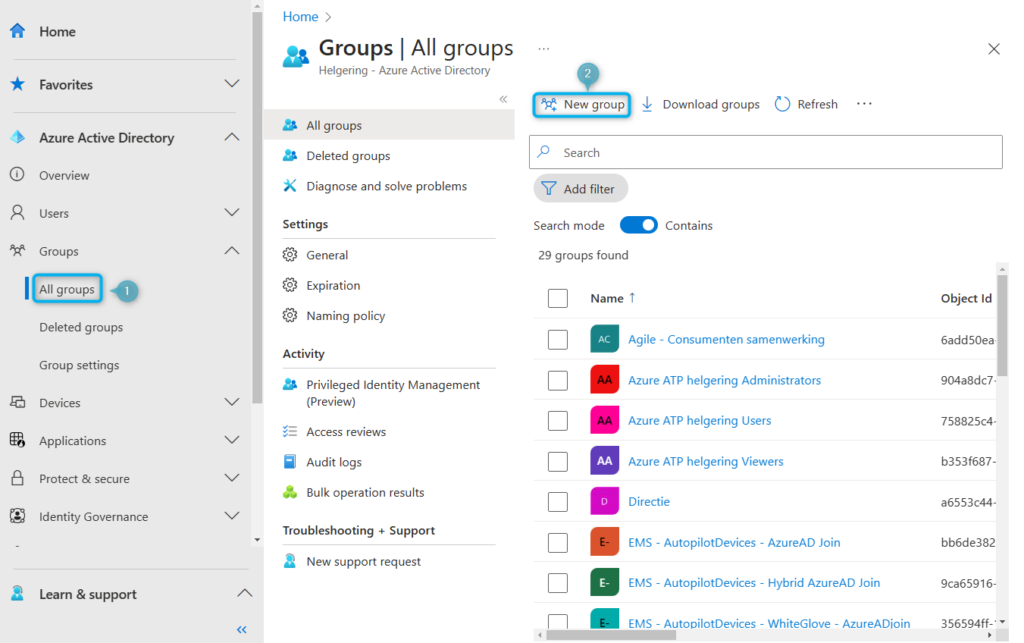
- Go to Microsoft Entra admin center and navigate to Azure Active Directory > Groups > All groups.
- Click on New group, to create a new group.
- Give your group a name and optionally a description.
If you plan to use PIM groups for activating multiple Azure AD roles simultaneously, be sure to make the group role assignable. While this used to be a requirement for all PIM groups, this is no longer necessary.
- Click Create.
We will now onboard the group into Privileged Identity Management in order to manage its membership.
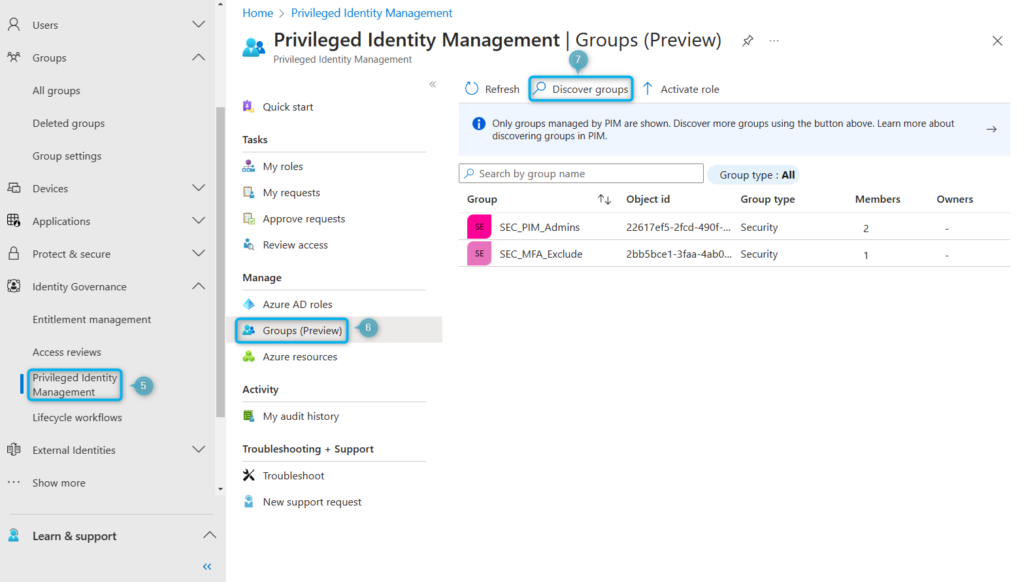
- Navigate to Identity Governance > Privileged Identity Management.
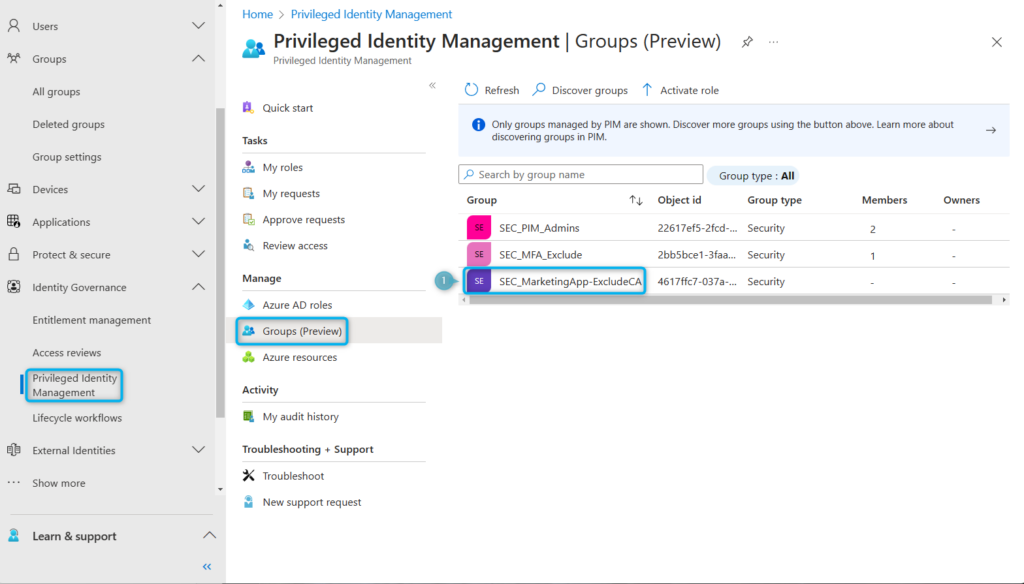
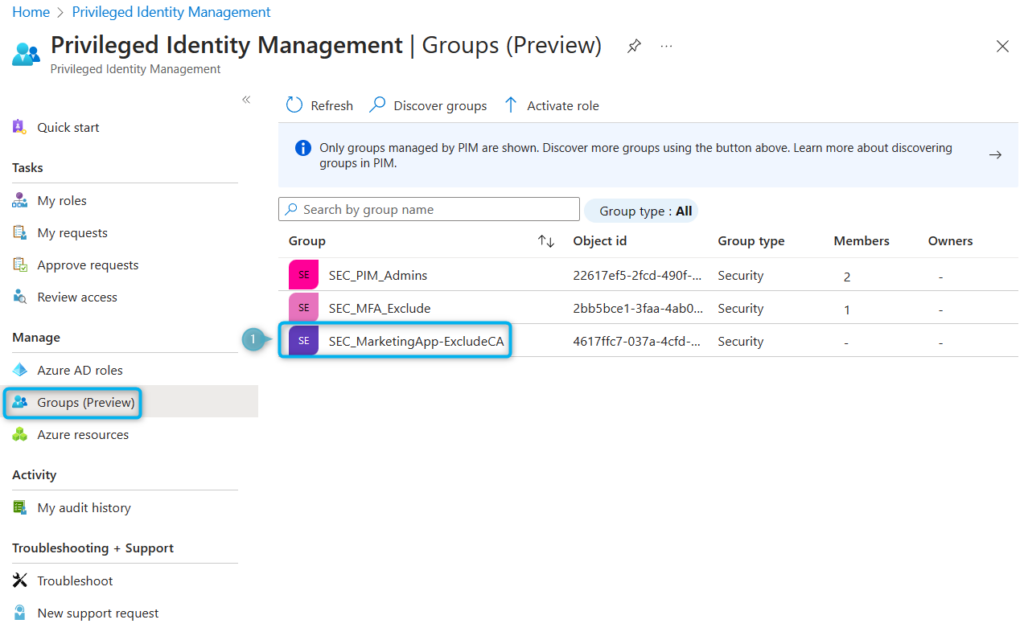
- Navigate to Groups, to see all the groups that are being managed by Privileged Identity Management.
- Click on Discover groups.
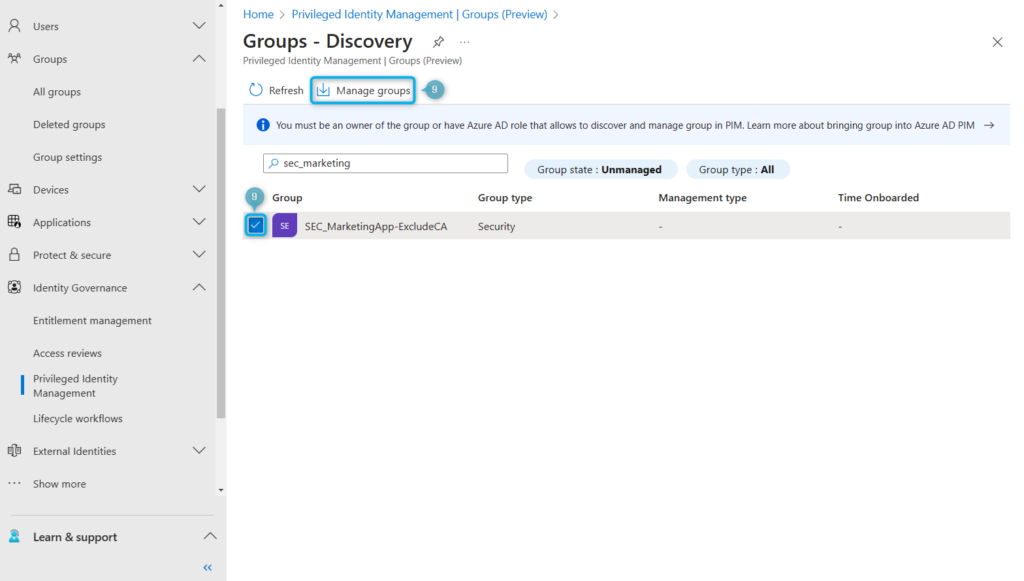
- Search and Select the newly created group.
- Click Manage Groups and Ok to onboarding selected groups into Privileged Identity Management.
Configure PIM group settings
With the security group now managed by Privileged Identity Management, we can now refer to it as a PIM group and proceed to configure its settings.
- Navigate back to Privileged Identity Management > Groups and Click on the group.
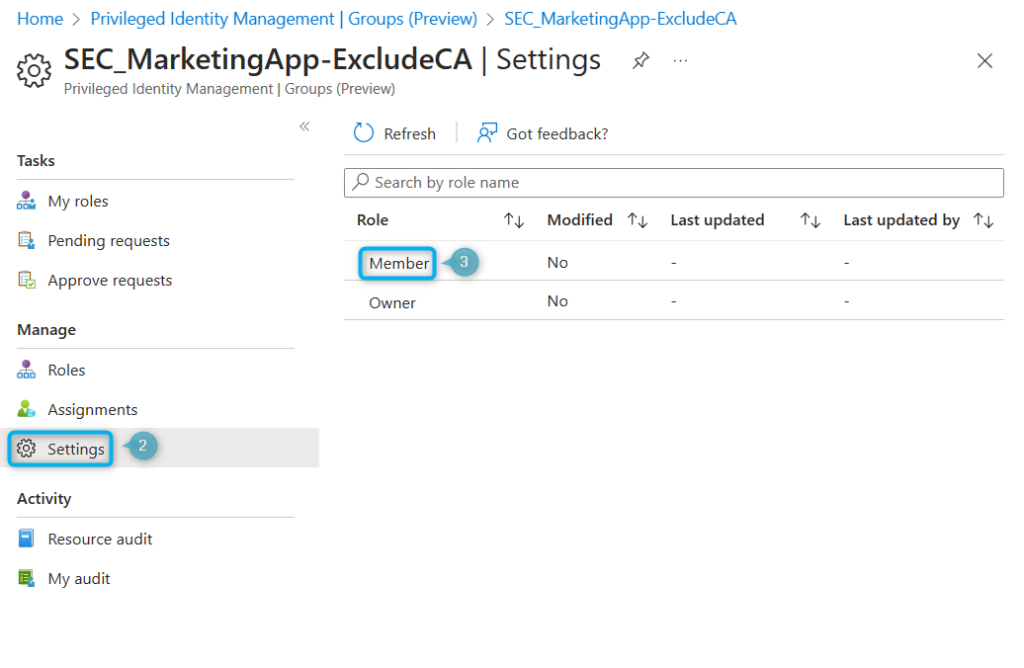
- Navigate to Settings, click on the Member role and then the Edit button.
Optionally, you can configure the “Owner” role so that users who activate the PIM group will be added as group owners.
Next we can configure the requirements for users to be able to activate the PIM group.
- Configure the activation settings you would like to use and click Next: Assignment.
If you want to control when people can activate the PIM group, I would recommend selecting the “Require approval to activate” feature. Requiring a justification and/or Azure MFA can also be good features to configure.
Next we can configure for how long and which kind of assignments are allowed. In our scenario, we will only allow permanent eligible assignments, this way permanent conditional access exclusions are not allowed.
- Configure the assignment settings you would like to use and click Next: Notification.
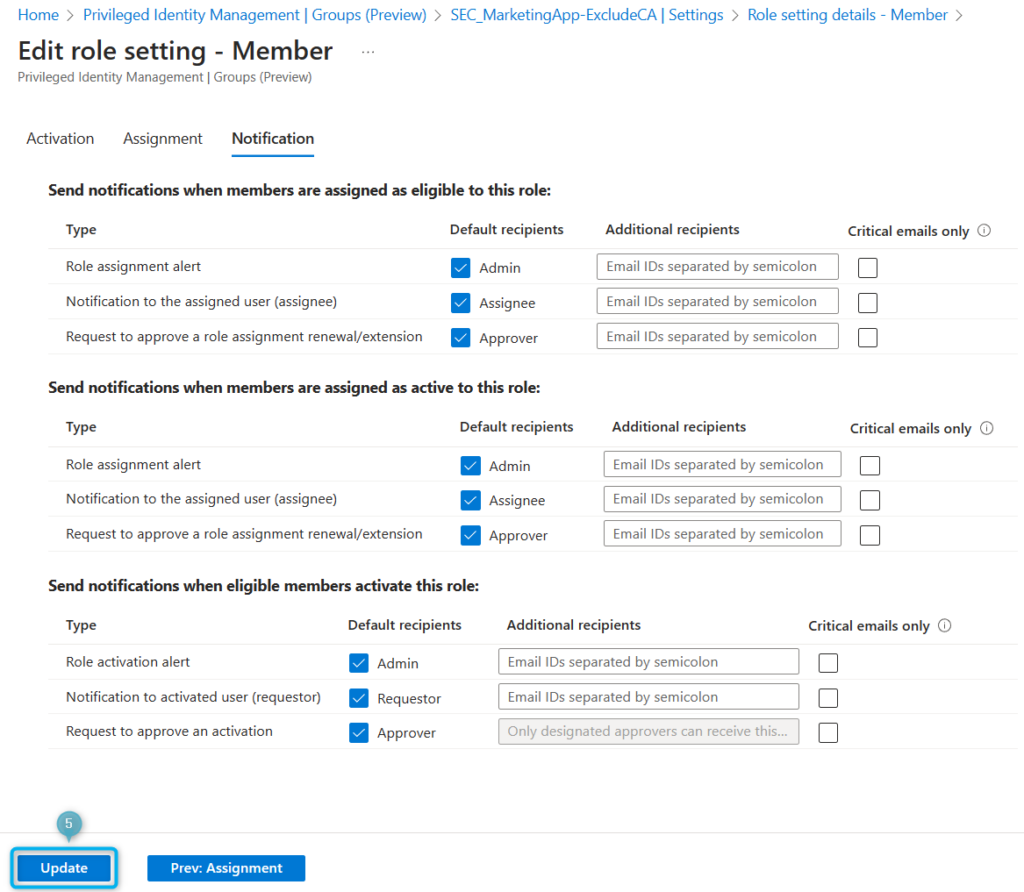
Next we can configure notifications to be sent during the PIM activation process, which can be very useful for governing access. However, make sure that users are not unnecessarily spammed with too many messages.
- Configure the notification settings you would like to use and click Update.
Add PIM group assignments
With the PIM group settings configured, we can now move on to assigning the users who will be able to activate the PIM groups.
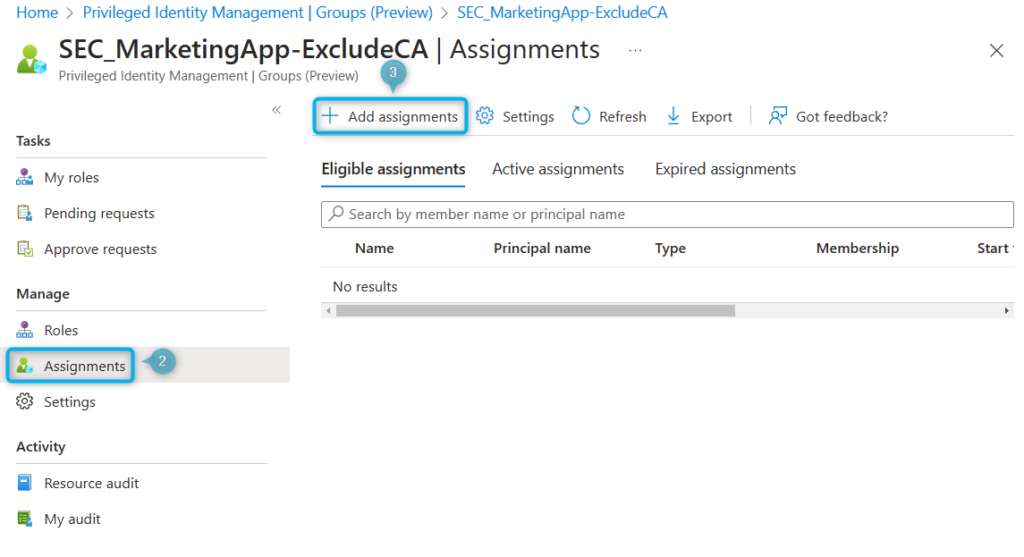
- Navigate back to Privileged Identity Management > Groups and Click on the group.
- Navigate to Assignments.
- Click on + Add assignments.
- Select the Member role, or alternatively the “Owner” role if you want to add users as an owner.
- Select the Users who will be able to activate the PIM group and exclude themselves from the Conditional Access policy.
- Click Next.
- Select the Eligible assignment type and click Assign, alternatively you can set a start and end date for the assignment to automatically clean up after itself.
Add PIM group to Conditional Access policy
Now that we’ve created and configured the PIM group, we can add it as an exclusion to the Conditional Access policy.
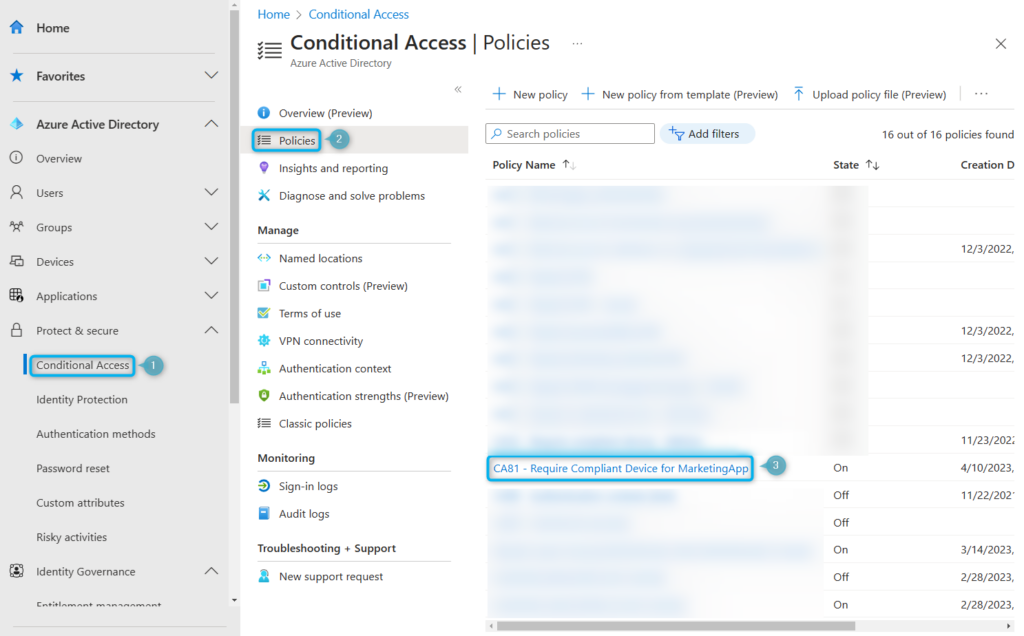
- Navigate to the Microsoft Entra admin center > Protect & Secure > Conditional Access.
- Navigate to Policies.
- Click on one of you’re Conditional Access policies, I’m selecting my Require Compliant Device for MarketingApp policy.
- Add the PIM group to the excluded users and groups.
- Click Save.
Activating the PIM group
Now that we are completely done configuring lets take a look at the user experience when activating the PIM group to be excluded from the Conditional Access policy.
- The user will have to navigate to Privileged Identity Management from the Azure Portal or the Microsoft Entra admin center and click on My roles.
- Navigate to Groups.
- Click on Eligible assignments.
- Click Activate.
- Add a reason and duration, then click Activate.
When all three stages are completed, and the approval (if enabled) is granted, the activation of the PIM group is successful.
As you can see the user has been added to the security group and is now automatically excluded from the Conditional Access policy.
Conclusion
I believe that using PIM to manage Conditional Access exclusions can significantly reduce the number of permanent exclusions needed for a policy, although it will probably not eliminate them entirely. In such cases, it can be helpful to use Access Reviews to periodically review and remove any permanent exclusions, as a useful addition or replacement for this approach.
Stay tuned for an upcoming blog post on how to manage Conditional Access exclusions with Access Reviews.
Manage Conditional Access exclusions with PIM
Would you like to share your thoughts?
Your email address will not be published. Required fields are marked *








6 Comments