My favorite Conditional Access policies to implement (part two)
This post is the second part of my favorite conditional access policies to implement. If you haven’t read part one yet, you can find it here. In this post, I’m providing a high-level overview of five more conditional access policies to further harden your security posture. I’ll talk about why the policies are important, and help you configure and prepare for implementation.
Today’s post will cover the following sections:
- Policy 6: Block access for unknown or unsupported device platforms
- Policy 7: Enforce app-enforced restrictions on unmanaged devices
- Policy 8: Block access from desktop apps on unmanaged devices
- Policy 9: Sign-in risk policy
- Policy 10: User risk policy
- Wrap up
Policy 6: Block access for unknown or unsupported device platforms
Many conditional access policies are often applied to specific device platforms such as Windows, MacOS, Android, iOS or Linux. While there can be good reasons for doing so, you don’t want to leave any gaps in your conditional access policies.
Let’s say your organization allows Windows, MacOS, and iOS devices. You have specifically designed policies for them, including configuration, compliance, update, and conditional access policies. Suddenly, you notice that some users are working from Android devices, while not respecting your policies.
Because you didn’t plan for these devices, users might have access to your environment with minimal or no security policies applied. The policy I am suggesting here will help you close gaps and block any unsupported device platforms.
But, there’s another reason for implementing this policy. Did you know attackers can spoof their device platform to avoid conditional access policies, even appearing with “empty” device platforms in your sign-in logs? This policy will prevent these attacks by default, which is useful, even if you allow all device platforms.
How to Configure
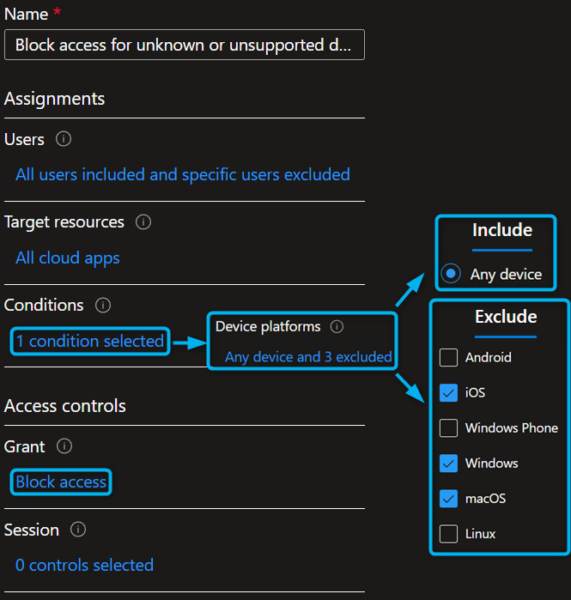
So, let’s stick to our previously mentioned scenario. We allow access for users working from Windows, MacOS, and iOS devices. But, we will block all others, even if the sign-in appears to be coming from an unknown device platform. To achieve this, we’ll create the following conditional access policy.
Including all device platforms and excluding specific ones allows us to indirectly block access from any unknown device platform. If we were to take the opposite approach, including specific device platforms, we wouldn’t be able to cover these unknown device platforms.
How to Prepare
Before implementing the “Block access for unknown or unsupported device platforms” conditional access policy, there are a few things to prepare for:
Platform choice: deciding which platforms to block shouldn’t be a hard decision, but do think about the impact this policy will have on your environment. If many users have been working from these devices for a long time, proper communication will be important, to ensure that your users and helpdesk are well-prepared for this change.
False positives: in some cases, legitimate sign-ins may appear as if they are coming from an unknown device platform, and therefore be blocked by this policy. Look for any sign-ins where the operating system appears empty. From my experience, this doesn’t happen very often, but is typically limited to specific apps, mostly mobile apps. If this happens, you might need to make an exception for that specific app.
Policy 7: Enforce app-enforced restrictions on unmanaged devices
In the first part of this blog post, I talked about how you can implement the Require Session Policy for Unmanaged Devices conditional access policy to deal with data leakage risks on unmanaged devices. An alternative, yet very similar, approach is to use app-enforced restrictions setting in conditional access. This method applies web restrictions onto users working from unmanaged devices to minimize the risk of data leakage.
App-enforced restrictions come with disadvantages when compared to session policies. For instance, it lacks the capability to restrict copy/paste actions, and its support is limited to Exchange Online and SharePoint Online. In comparison, session policies can support more apps, even third-party cloud apps.
But on the upside, you are able to use the app-enforced restrictions policy with a Microsoft Business Premium subscription, while the session policy with Microsoft Defender for Cloud Apps requires a Microsoft 365 E3 subscription.
In addition to being the more suitable choice for many small to mid-sized business organizations, app-enforced restrictions can also be combined with Sensitivity Labels. This allows you to apply these restrictions to specific SharePoint or MS Teams sites, rather than having them applied to all sites. If you want to learn how to implement app-enforced restrictions with Sensitivity Labels, check out this post.
How to Configure
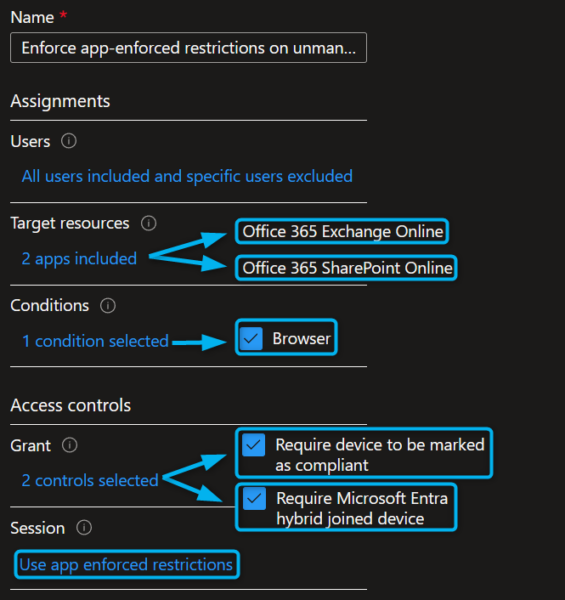
The conditional access policy itself is configured to enforce app-enforced restrictions whenever a sign-in occurs from an unmanaged device through the browser. But since app-enforced restrictions only support the Exchange Online and SharePoint Online service, we will only target those. It’s important to note that this policy will also automatically apply to Microsoft Teams and OneDrive, because SharePoint Online is the service used to store data.
After enabling this policy, users will not be allowed to download, print or sync data anymore from unmanaged devices. If you want to read a more in-depth guide on how to configure these app-enforced restrictions, check out this post.
How to Prepare
Before implementing the “Enforce app-enforced restrictions for unmanaged devices” conditional access policy, there are a few things to prepare for:
Pre-configuration SharePoint Online: you can’t configure this conditional access policy from scratch like any other policy; some pre-configuration steps are necessary. First, you’ll need to enable the access control policy for unmanaged devices from the SharePoint Admin Center. Afterward, two conditional access policies will be created. One of them is the app-enforced restrictions policy itself, which you can then deactivate and reconfigure to your liking until you are ready to deploy it in production.
The second policy that will be created is the “block access from desktop apps on unmanaged devices” policy, which I’ll talk about in the next chapter.
Pre-configuration Exchange Online: before the app-enforced restrictions can be applied to the Exchange Online service, the feature itself must me enabled. You can achieve this by using the following cmdlet after connecting to the Exchange Online management shell.
| Set-OwaMailBoxPolicy -Identity OwaMailboxPolicy-Default -ConditionalAccessPolicy ReadOnly |
Custom web parts or images: if you are using custom web parts or images on your SharePoint sites, you’ll need to exclude the site assets library on the site by using the SPList API. If you fail to do this, custom images will not be visible, and custom web parts could completely break the site for users from unmanaged devices.
Policy 8: Block access from desktop apps on unmanaged devices
In the previous blogpost, I talked about how to apply web restrictions with session policies to users working from unmanaged devices, and in the previous chapter we talked about doing the same with app-enforced restrictions.
What we must not forget is that users can leak data onto unmanaged devices just as easily through desktop apps. Users can and will install the Office suite onto their personal devices and sign in to Outlook, OneDrive, MS Teams, or any other desktop app. From there, they are allowed to do anything they want because web restrictions will of course only apply to the browser.
This means we’ll need a second policy to bridge the gap, and for now, let’s call it the “block access from desktop apps on unmanaged devices” policy. With this policy, we’ll block access to desktop apps for users working from unmanaged devices, leaving them with the limited web experience option to minimize the risk of data leakage.
If you prefer an alternative for desktop apps, there’s a new solution called Mobile Application Management for Windows. Unfortunately, as of now, only the Microsoft Edge app is supported. So we’ll have to wait for Microsoft to add support for more desktop apps. If you’re interested in MAM for Windows, check out this post.
How to Configure
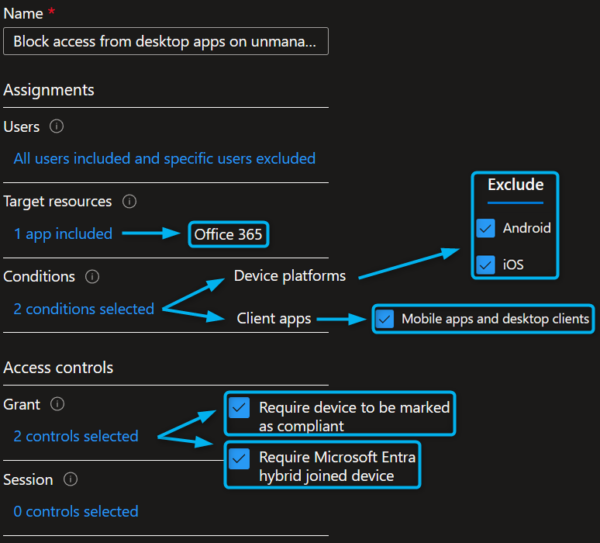
The configuration for this conditional access policy is pretty straightforward. We are going to require devices to be compliant or be Microsoft Entra ID joined; otherwise, access will be blocked from desktop apps. For this policy, I’ll exclude Android and iOS devices because, in most cases, I couple this policy with a MAM for Android & iOS policy, as discussed in the previous post.
If you manage Android & iOS devices with Microsoft Intune and do not allow personal devices, there’s no need to exclude them in this conditional access policy. Additionally, if you want, you can target more apps, or even all cloud apps, instead of only targeting Office 365 apps
How to Prepare
Before implementing the “Block access from desktop apps on unmanaged devices” conditional access policy, there are a few things to prepare for:
Intune Management: ensure that all of your corporate devices are properly managed with Microsoft Intune; otherwise, many users might be blocked from accessing Microsoft 365 desktop apps.
Communication: if users are used to working with desktop apps from their personal devices, you’ll need to communicate to them that this is no longer allowed. They should now work from their corporately managed device, or use the browser from their personal device to access corporate data.
Policy 9: Sign-in risk policy
Identity Protection, or Microsoft Entra ID Protection as it’s called today, is one of my favorite solutions to work with. It’s quick and easy to implement, while being highly effective in detecting and automatically remediating identity-related risks and attacks.
An important part of this solution is detecting user sign-ins that happen without the user’s approval, indicating a possible breach. There are various signals used such as sign-ins from malicious, anonymous, or malware-linked IP addresses, impossible travel detections, or password spray attacks. Check out the full list of potential sign-in risk signals here.
Upon detecting a signal, it classifies the sign-in as low, medium, or high risk. This is where Conditional Access steps in, responding to these risk levels, such as requiring an extra multi-factor authentication prompt or blocking access altogether.
How to Configure
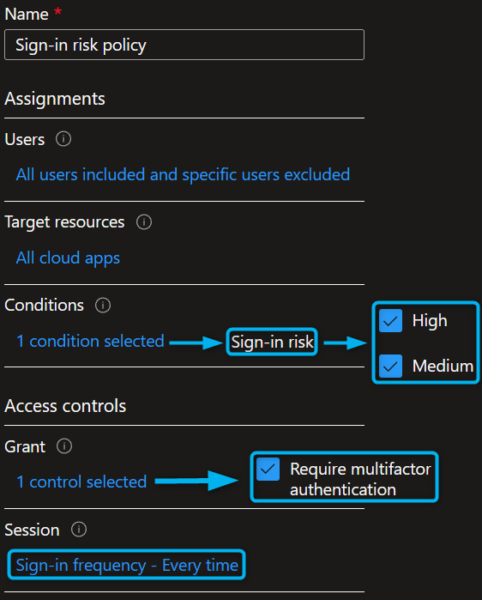
In setting up the sign-in risk policy, we’ll require multi-factor authentication for medium and high risk sign-ins. By choosing the sign-in frequency option in the conditional access policy, we can enforce MFA every time, even if the user (or attacker) has previously satisfied MFA.
We can achieve something similar through the risk remediation policies in the Identity Protection blade. However, these policies are going to be deprecated from October 1st, 2026 and are no longer recommended.
The advantage of using risk-based conditional access policies compared to the old risk remediation policies is that you have a lot more options at your disposal. For example, you can enforce different access and session controls based on the level of risk. This way, you can ensure that multiple policies can be implemented to meet your needs.
One example scenario that I can also recommend is blocking access for high-risk sign-ins and enforcing MFA on low or medium sign-ins. You can even create different policies for different user groups if you would like.
How to Prepare
Before implementing the “Sign-in risk” conditional access policy, there are a few things to prepare for:
MFA registration: before activating the sign-in risk policy, users must be registered for multi-factor authentication. This initial MFA registration can be done manually or automatically through an MFA registration policy, which is also a part of Microsoft Entra ID Protection. If users have not been registered for MFA before and a risky sign-in requiring MFA is detected, it will block user access instead.
Trusted named locations: for more accurate sign-in risk detection, add trusted named locations. Include your office or remote locations in the “Named locations” under “Conditional Access” and mark them as trusted. You don’t need to specifically exclude these locations in the risk-based conditional access policy; the system will automatically lower the sign-in risk for user authentications from these trusted locations.
Licensing: users benefiting from a risk-based conditional access policy require the Microsoft Entra ID P2 license (formerly Azure AD P2). This license is included in the Microsoft 365 E5 subscription, Microsoft 365 E5 Security, or EMS E5 add-on license.
Policy 10: User risk policy
Another part of the Microsoft Entra ID Protection solution involves the evaluation of user risk indicators, such as instances where the user’s password is leaked or if users show unusual behaviors known to be attack patterns. Microsoft is somewhat vague on the indicators for user risk, likely for security reasons to prevent attackers from knowing what to avoid. You can find a complete list of potential user risk indicators here.
Upon detecting these indicators, Microsoft classifies the user risk as low, medium, or high. Just as with sign-in risk, we can use conditional access to respond to these risk levels, such as enforcing a password reset or blocking access.
How to Configure
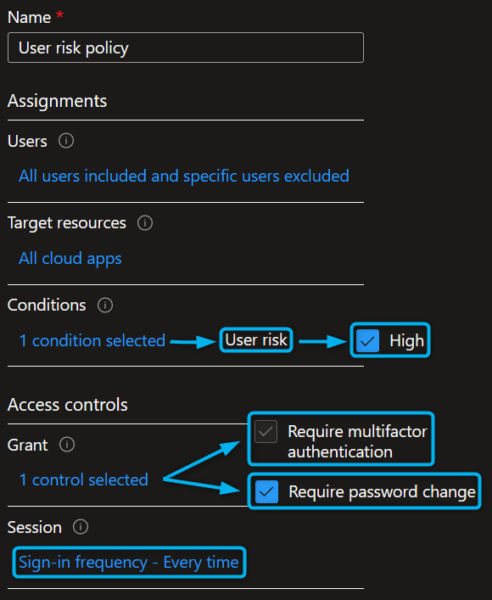
When configuring the user risk policy, we’ll simply require MFA and a password reset whenever a high user risk is detected. Just as with the sign-in risk policy, we’ll also select the sign-in frequency option to ensure that MFA will be satisfied, even if this has been done previously. Only after MFA is satisfied, will the user be able to reset his or her password.
Similar to the sign-in risk policy, you can use these risk-based conditional access policies by applying access and session controls for different scenarios. This way, you can ensure that these policies can meet your specific needs.
For instance, you can configure the policy to block access for high user risk detections, and create a separate policy that requires a password change for medium user risk detections.
How to Prepare
Before implementing the “User risk” conditional access policy, there are a few things to prepare for:
Password reset: from the settings blade of Microsoft Entra ID Protection, you can now activate a new setting called “Allow on-premises password change to reset user risk.” Without enabling this setting, you had to manually remediate the user risk after the user reset his or her password. For many organizations, this was a deal-breaker, but it doesn’t have to be anymore.
Notifications: apart from using conditional access to let users to remediate user risks, it’s advisable to set up notifications directly from the Microsoft Entra ID Protection settings blade. This way, you can investigate and respond to user risk detections, and remediate them manually if needed.
Licensing: the Microsoft Entra ID P2 (formerly known as Azure AD P2) license is required for all users benefitting from a risk-based conditional access policy. This license is included in the Microsoft 365 E5 subscription, or Microsoft 365 E5 Security or EMS E5 add-on license.
Wrap up
Once again, I’ve enjoyed sharing more of my favorite conditional access policies, and hopefully, it has helped others in preparing for their own implementations. I might consider writing a part three in the future, but initially, this was supposed to only include my favorites, so we’ll see.
Have a great day, and if you have any questions, feel free to leave a comment down below.
My favorite Conditional Access policies to implement (part two)
Would you like to share your thoughts?
Your email address will not be published. Required fields are marked *

10 Comments